Overview
AI Workflow User Guide
The AI Workflow is the core brain of this system. Through a visual drag-and-drop interface, you can design the AI's thinking and execution logic just like drawing a flowchart. This guide will take you deep into how to create, configure, and optimize your workflows.
1. Getting to Know the Workflow Editor
When you enter "Workflow Management" and create or edit a flow, you will see the following areas:
- Canvas: The central area for arranging and connecting nodes.
- Node Menu: Right-click on a blank space on the canvas to pop up the node selection menu.
- Configuration Panel: Click on a node to configure its specific parameters by right-clicking or using the panel that pops up on the right.
- Test Sandbox: The test button on the side or top allows you to instantly simulate conversations and view execution paths.
2. Core Nodes Explained
Workflows are composed of "nodes" with different functions. To meet various business scenarios, we classify nodes into four categories:
2.1 Flow Control
These nodes are used to control the direction and logic of the workflow.
- Start: The starting point of the workflow. Each workflow must have exactly one.
- End: Marks the natural end of the flow.
- Condition:
- Function: Similar to a "traffic controller". You can set rules (e.g., "If the customer mentions 'refund'", or "If the current time is night") to let the flow take different branches.
- Configuration: Supports multiple judgment logics such as "contains", "equals", "is not empty", etc.
- Intent Recognition:
- Function: Intelligently identifies what the customer wants to do (e.g., wants to "check order" or "chat casually").
- Configuration: Define multiple intent branches, and the AI will automatically classify and take the corresponding path based on the customer's words.
2.2 AI Capabilities
These nodes endow the workflow with a "brain", using large models for thinking and processing.
- LLM Generation:
- Function: The most basic AI node, generating replies based on prompts.
- Configuration: Set "System Prompt" to define the AI's persona.
- Agent:
- Function: This is one of the most powerful nodes. It not only generates text but can also think autonomously.
- Mechanism: You can configure an LLM model and a set of Tools for it. The Agent will automatically decide whether to answer directly or call one or more tools to solve the problem based on the task goal.
- Configuration: Select a model (models with strong reasoning capabilities like GPT-4 are recommended) and check the list of tools it can use.
- Knowledge Retrieval:
- Function: Searches for answers in the documents you uploaded.
- Translation:
- Function: A professional translation node supporting translation between multiple languages, commonly used in cross-language customer service scenarios.
- Image Text Split:
- Function: When a customer sends a message containing both images and text, this node can split them for separate image recognition or text processing.
2.3 Interaction
These nodes are responsible for interacting with customers or processing data.
- Reply: Sends a message to the customer.
- Human Transfer: Seamlessly transfers the conversation to the human customer service system.
- Parameter Extraction:
- Function: Extracts key information from the customer's natural language.
- Example: If a customer says "Book me a ticket to Beijing for tomorrow", the node can extract
time: tomorrow,location: Beijingand save it as structured data.
- Variable Setting:
- Function: Used to record temporary data (variables) in the flow for use by subsequent nodes.
- Set Metadata:
- Function: Tags the current session or stores background information (such as "user level", "source channel"), usually used for more complex business logic or data statistics.
2.4 Advanced
- Tool Execution:
- Function: Forces the execution of a specific tool (unlike the Agent node, this is a forced execution, not decided by AI).
- Flow:
- Function: Calls another published workflow.
- Scenario: Splits complex businesses into multiple small flows (such as independent "after-sales process") and calls them like building blocks in the main flow to achieve reuse.
- Agent Update/End: Used to dynamically update the agent's status or force the session to end within the flow.
3. How to Build a Workflow from Scratch?
Step 1: Define the Goal
Before you start, clarify what problem this flow needs to solve. For example: "I want to make an assistant that can automatically check orders and answer common questions".
Step 2: Place and Connect Nodes
- Start: Exists by default.
- Intent Recognition: Connect to the Start node and set two intents: "Check Order" and "FAQ".
- Path A (Check Order): Connect a "Tool Execution" node (select the order query tool), and then connect a "Reply" node.
- Path B (FAQ): Connect a "Knowledge Retrieval" node, then connect an "LLM Generation" node, and finally connect a "Reply" node.
Step 3: Configure Parameters
Click on each node and fill in the necessary configurations:
- In the LLM Generation node, write a prompt: "Please answer the customer politely based on the knowledge base content."
- In the Intent Recognition node, add intent tags.
Step 4: Test and Publish
Click the "Test" button, enter a sentence (such as "Where is my package?"), and observe if the connections on the canvas jump correctly. After confirming it's correct, click "Save and Publish".
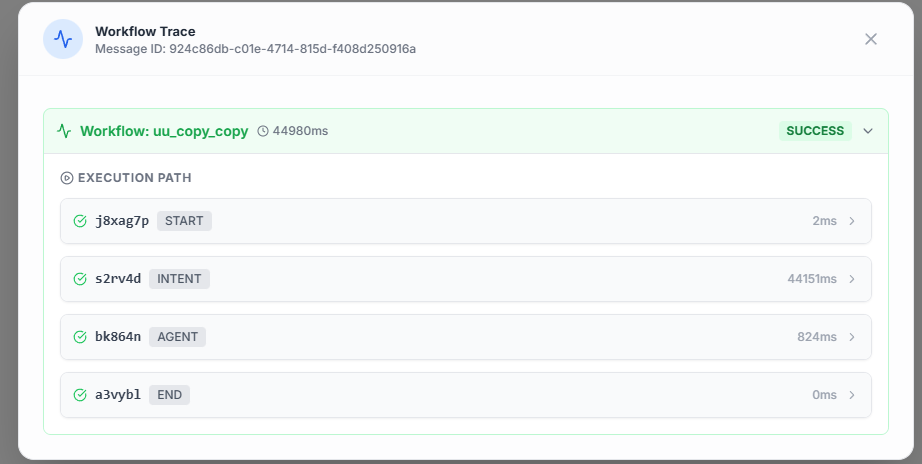
4. Advanced Tips: Execution Trace
If you find that the AI's answer does not meet expectations, you can use the Execution Trace function:
- View Path: The system will highlight the nodes actually passed through in the conversation.
- Check Input/Output: You can click on each node to see what data it received and what result it outputted. This helps you quickly locate whether "the knowledge base didn't find it" or "the AI prompt was written poorly".

5. Common Application Templates
- Auto Q&A Flow: Start -> Knowledge Retrieval -> LLM Generation -> Reply -> End.
- After-sales Diverter: Start -> Intent Recognition -> (Branch 1: Human Transfer / Branch 2: Order Query Tool / Branch 3: Knowledge Base Answer).
Now, start designing your first intelligent workflow!